Table of Contents
WordPress site owners are continuously fighting to keep hackers out of the site admin. Brute force attacks on the wp-login page, remote code execution due to a zero-day plugin vulnerabilities, or hacker toolkits that try to access plugin files by cycling through lists of known vulnerabilities – these types of attempts must be blocked. I’ve discovered that it is fairly common for people to have two or even three security plugins active on their site. What if for some types of sites you could stop many common types of attack in their tracks?
I’ve been on the lookout for site lockdown / hardening techniques. It is not very often that I come across something new that I haven’t tried yet, but I recently found something interesting while reading the documentation for PhantomWP. PhantomWP is a new project by Ovidiu Maghetiu that provides a platform for using WordPress for the backend of your site and Astro for the frontend. PhantomWP streamlines the whole process and removes many of the development pain points. People often cite “headless WordPress” as an option that can be more secure because visitors aren’t directly hitting your WordPress site, but instead are hitting a frontend hosted elsewhere. I noticed in the docs that PhantomWP offers a site lockdown feature that completely blocks access to WordPress, unless the browser supplies a custom HTTP Request Header.
After reading about it I realized that this could be adapted more generally for some other use cases. This lockdown option could work nicely for certain types of sites and would stop some common hacker activity. So, I am experimenting with this, and that is what I’m describing in this article. The idea comes from the PhantomWP docs and Ovidiu has generously allowed me to share what I learned from the PhantomWP docs here.
Video Verison
The video has the full step-by-step walk-through for applying this security hardening technique.
Who This Hardening Technique Works For
This is not a universal solution. More on that in the discussion section at the end. But of course that begs the questions, who is this for? This is a lock down technique for power users because in this example we are going to be modifying the .htaccess file and creating a custom HTTP Request Header. You need to understand what you are doing and you should have access to your site via FTP or SSH in the event you make a mistake during setup, so you can undo any changes you made.
What we are going to do is:
- Create a custom HTTP Request Header that is added when we visit our website. We will do this by using a browser extension to output our custom header when we visit our site’s domain.
- Then we are going to add some rewrite conditions to the site’s .htaccess file that blocks access to the WordPress login page, the WordPress admin, and also blocks direct access to PHP files if the visitor’s web browser doesn’t send our custom Request Header. The frontend of the site is not blocked, but only those who have the browser extension and output the correct custom header will be able to login and work in the admin.
- We will do some tests.
In addition to being a power user, this hardening technique doesn’t make sense for every type of site. For example, you probably wouldn’t use this on client sites. However, for websites where the site owner is a power user and the sole user, this is a pretty nifty idea.
Both Apache and Open Lite Speed servers make use of the .htacces file, though the support for directives varies. OLS generally supports the Apache mod_rewrite rules, such as I use in the examples, but not the other directives. Also, there could be minor differences in syntax. Nginx uses a different format for its rules. You could also setup similar rules on Cloudflare. If you are using Cloudflare, you would have the additional advantage of blocking hackers before they even reached your site. So the examples I showing here will work for Apache and OLS, but if you are using Nginx or Cloudflare then you will need to adapt the code.
Step 1 – The .htaccess File
I start out by making a backup copy of the original .htaccess file. Here is the code I’m adding to the top of the .htaccess file. Note, the .htaccess file is a hidden file. If you don’t see it then you should enable viewing of hidden files in order to find it for editing.
# Extra Site Security - Block admin requests with secret header
RewriteEngine On
RewriteCond %{REQUEST_URI} ^/wp-login\.php [NC,OR]
RewriteCond %{REQUEST_URI} ^/wp-admin/? [NC]
RewriteCond %{HTTP:X-Web-Express-Mode} !^full_cache_1024$
RewriteRule ^ - [F]- The first line is a comment that tells what this block of code is for, so we can remember when next we edit this file.
- The next line turns on the rewrite engine.
- Notice that the next three lines are conditions that check what is being sent to the web server.
- The third line looks for the “wp-login.php”. The NC means that the match is not case sensitive and the OR indicates that there are more conditions.
- The fourth line checks for “wp-admin”, that is if the visitor is trying to access the admin area. The NC and OR parameters work the same as the previous line.
- The fifth line checks to see if the visitor is trying to access PHP files directly, something that a visitor who is not logged in should not be doing, there is again a case insensitive flag.
- The last rewrite condition looks for the omission of our special HTTP Request Header. The custom header name goes after the “HTTP:”. I named it “X-Web-Express-Mode” to make it non-obvious what it was for. You can name your’s something else if you prefer. I gave the value “full_cache_1024”, also keeping it vague. The value goes between the “!^” and “$”. So this condition checks to see if our custom header is missing and if so then the final line is triggered.
- The final line returns 403 forbidden if any of the conditions are true.
I’d suggest adding X-Web-Express-Mode / full_cache_1024 (or whatever you used) to your password manager. That will make it easier to retrieve when you are doing step two and in the future when adding the Request Header to additional browsers.
Step 2 – The ModHeader Browser Extension
In this step we need to tell our web browser to output the custom HTTP Request Header. There is a free browser extension called ModHeader with versions for Chrome-based browsers, Firefox, and Edge.
Install this extension from your browser’s extension store.
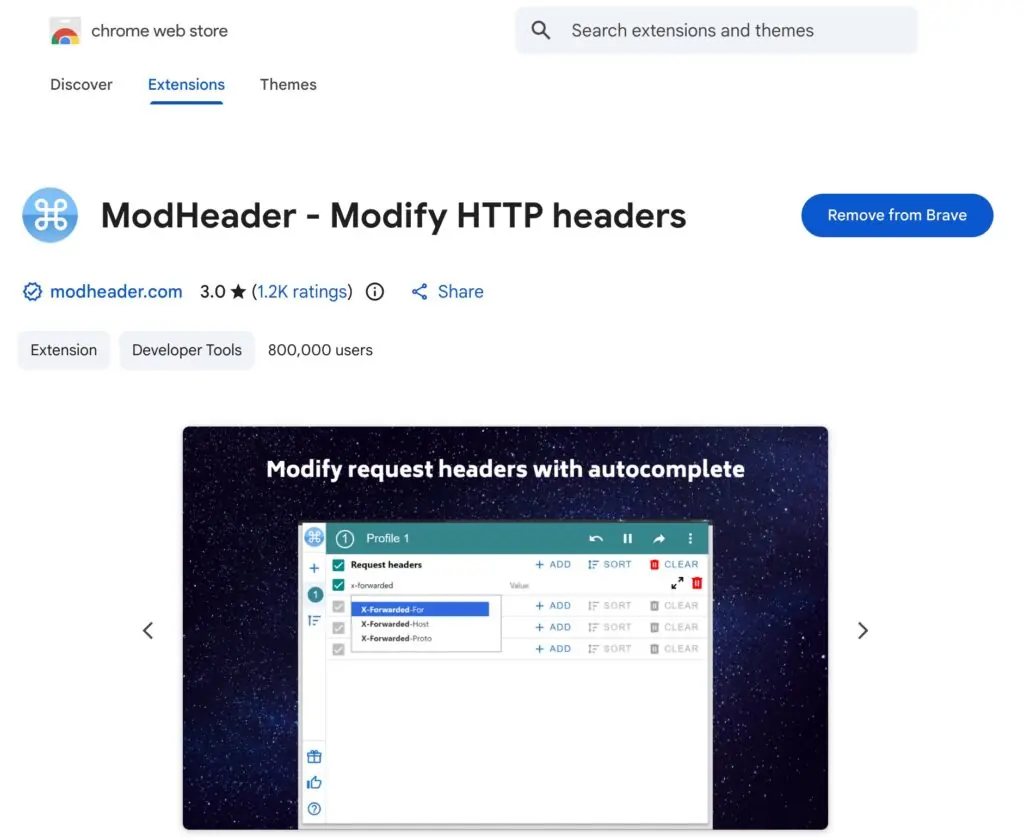
Once you have it installed, open the UI and for Request Headers, enter the name and value you gave your custom HTTP Request Header in the .htaccess file. Mine is shown in the screenshot below. Note the blue “Filter” button on the bottom. After you enter your Request Header, click that filter button and pick the domain option. Enter the domain for your website. In my example, I’m testing on local before adding this to my production site, so it is “webtng.local”.

Note, in the upper right corner of this interface there is a three dot menu and if you click on that you will see an option to “Always Stay Enabled”. I also clicked on that.
Step 3 – Testing
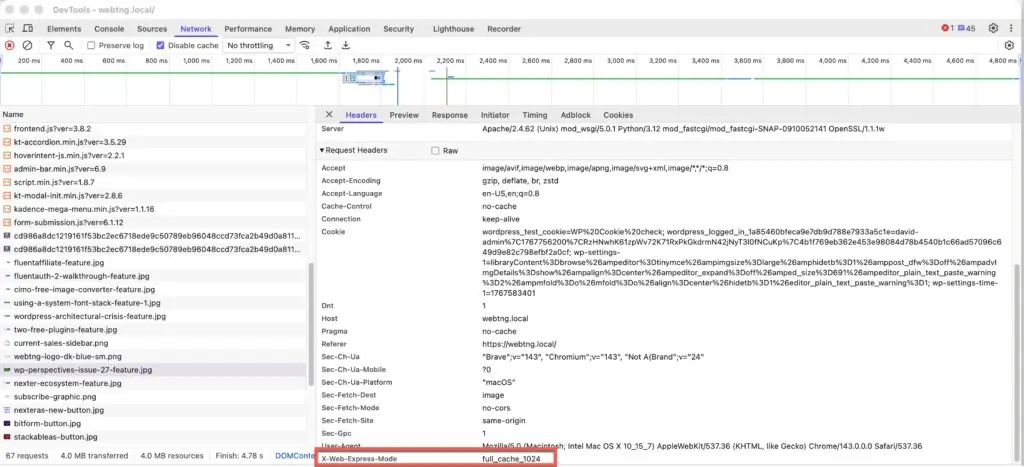
Now it is time to test. Start off testing the site with the browser extension configured to make sure you are able to access everything on the front and admin sides. As we are sending the request header it should all work. Oh, you can check that the request header is being sent on a Chome-based browser by opening the dev tools (right click on the page and select “inspect”), going to the Network tab, and then reloading the page. You will see a long list of all of the files loaded on the page. Select one of the files on the left, and then on the right, in the Headers tab, scroll down to Request Headers. You should see your custom header in the list.
Now open a different browser and go to the same website. So for my logged in user I am using the Brave browser and have the ModHeader extension installed on Brave. To test for a regular visitor, I’m going to use Firefox. First I tried the home page and clicked around the site, tried searching, the contact form, and other pages. Everything on the frontend worked.

Next I tried the login page and got a 403 forbidden.

I tried the login URL in upper case also. If we didn’t have the “[NC]” flag, upper case would have gotten through. I tried accessing the admin directly. I also found a PHP file in the plugins folder and tried going directly to that. All of the backend URLs are forbidden.
Everything worked OK on my testing site, so I implemented it on a production site. I changed the header and value from the examples shown here so as to keep these private. It didn’t work so I tried flushing the Open Lite Speed cache, but no success. Everything did work as expected, however, after I restarted with server. Note that this site was using ServerAvatar. I tried the same process with a site using the XCloud hosting control panel and the values weren’t cached.
Unfortunately that isn’t the end of the testing. I checked BlogValut, the service I use for site backups and these rules were blocking it. I got the IP addresses for BlogVault and added those to the .htaccess file. It now looked like this (note, I change the BlogVault IP addresses in the example here since I’m not sure if they want them shared).
# Extra Site Security - Block admin requests with secret header
RewriteEngine On
RewriteCond %{REQUEST_URI} ^/wp-login\.php [NC,OR]
RewriteCond %{REQUEST_URI} ^/wp-admin/? [NC]
# Only block if NOT from an allowed IP
RewriteCond %{REMOTE_ADDR} !^1\.111\.111\.94$
RewriteCond %{REMOTE_ADDR} !^1\.111\.11\.164$
RewriteCond %{REMOTE_ADDR} !^1\.111\.11\.234$
RewriteCond %{HTTP:X-Web-Express-Mode} !^full_cache_1024$
RewriteRule ^ - [F]
I tested the new rules and now BlogVault was happy.
Why Not Use Your IP Address?
Whitelisting and blacklisting IP addresses to control site access is not a new idea. Using your IP address instead of sending the custom HTTP Request Header would certainly work, as long as the IP address doesn’t change. Personally, I sometimes use a laptop when away from home and so I’m not always on the same IP. For that reason I like the idea of the Request Header. If you wanted to use your IP instead then you could try something like this, where you would change the 1.111.111.111 to your IP.
# Extra Site Security - Block admin requests with secret header
RewriteEngine On
RewriteCond %{REQUEST_URI} ^/wp-login\.php [NC,OR]
RewriteCond %{REQUEST_URI} ^/wp-admin/? [NC]
# Only block if NOT from an allowed IP
RewriteCond %{REMOTE_ADDR} !^1\.111\.111\.111$
RewriteRule ^ - [F]
There are a lot of options for hardening your site using .htaccess. There are many articles online and Jeff Starr has a book which does a deep dive into the topic. While it doesn’t cover this exact scenario, there are lots of recipes and examples.
Discussion and Conclusions
Some people reading this article are going to immediately understand how this works. Some will be comfortable experimenting, will try this out, and then “see” how it works. There are other people who might be pretty nervous about trying this. My advice, if you aren’t comfortable testing this then skip it. As I mentioned early on, it is a lockdown technique for power users. It isn’t for everyone, and also it isn’t for every WordPress site. It works for me because I am the only user and manage my sites myself.
This means that in addition to my security plugins, username / login, and two factor authentication (if you have that enabled), I have another security option active. I’m pretty excited about this experiment as it blocks off the WP login form and the admin, basically doing away with brute force login attempts.
I asked myself, if this technique is so great, why isn’t it an option in popular WordPress security plugins? I guess there are two reasons. First, most of the features in security plugins are ones that could be universally used. This technique doesn’t make sense for every type of site. Second, since it is an advanced power user technique, it is something that would be too challenging for many users. Offering this type of option might be a support issue. However, power users never see this option because it can’t be mass marketed.
As mentioned earlier in the article, the instructions for PhantomWP show the steps for Nginx and for Cloudflare, so I am confident that you can adapt the .htaccess code for use there. If you get it working with Nginx or Cloudflare please let me know along with the code snippet you used and I’ll add it here and give you credit for sharing it.
When I was initially testing this out I did try it on my testing site with several plugins which I know used AJAX. I had the thought that perhaps if “admin-ajax” was being used on the frontend, for example for a search form, that visitors might have a problem. I didn’t notice anything and if there is an issue I suspect it would be possible to add an exclusionary rule, but be aware that there could be configurations where you might run into a problem.
If you are a power user and try this out I’d love to hear from you how it went. I hope you find this article interesting and helpful.