
Table of Contents
Websites often need to generate a PDF. For example, ecommerce stores need to provide a downloadable receipt or online courses need to offer a course completion certificate. The good news is that Dynamic Content for Elementor has an option to create a PDF from an Elementor Pro form and in this article we’ll do a walk-through of the process so that you can start offering PDFs on your site.
Video Version
Prerequisites
To follow along with the tutorial, you will need to have a test site with Elementor core, Elementor Pro, and Dynamic Content for Elementor installed. We will also use the new Dynamic Shortcodes plugin, also developed by Dynamic.ooo. From v3.0.0, users of Dynamic Content for Elementor can benefit from a special version of the Dynamic Shortcodes plugin, included with their license, which automatically integrates and offers advanced features at no additional cost. Dynamic Content for Elementor has a few different options for rendering a PDF form, but the new HTML template option is the recommended way because you have good control over how the PDF content will be displayed. The other options might depend on the web browser being used or are older and don’t work as well.
In the HTML template you use HTML, CSS, and Dynamic Shortcodes to create basically a web page, but instead of it being rendered by the browser it is rendered by Dynamic Content for Elementor and saved as a PDF. This type of option is referred to as a “low code” option because while you are using code the functionality doesn’t require any complex programming. It should be straightforward for a power user, developer or anyone familiar with basic HTML and CSS. If you haven’t worked with HTML and CSS before the good news is that there are lots of good help resources available, and of course you can follow along with this tutorial. There will be a “resources” section at the end with links to help should you have questions or want to do something more advanced. I’ve also found the Dynamic.ooo support team to be very helpful.
Before we go into the Elementor editor, we should make sure that the Dynamic Content for Elementor features we are going to use are enabled. In the admin go to the Dynamic Content for Elementor menu and then the Features page. At the top there is a tab for Extensions. Select that and then scroll down to the section labeled “for Elementor Pro Form.” If you click on the circle on the card for each extension then you can toggle the extension on or off. Make sure these are on and remember to save before leaving the page.

Test Scenario
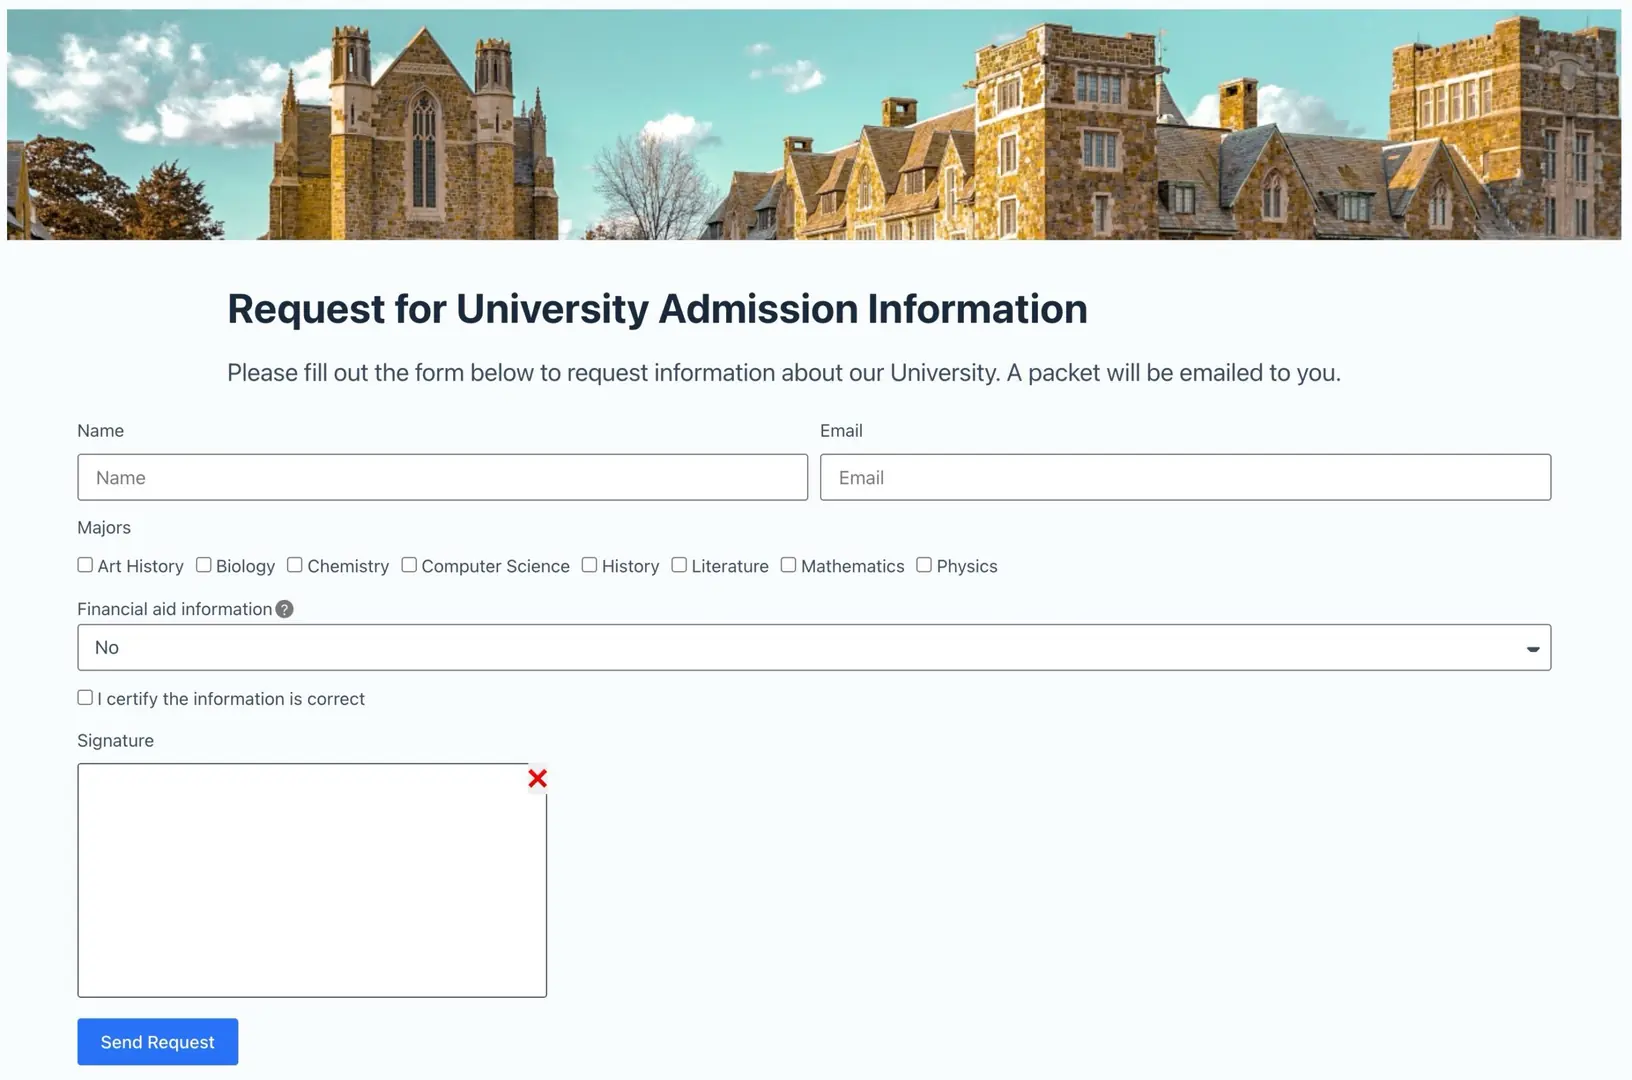
We are going to create a form to request admission information for university. Prospective students will submit their name and email address and pick the subject majors they are interested in studying. If they would like to also receive information about scholarships then they will also need to submit their academic test scores for Literature, Mathematics, and Science. People submitting the form for information will also need to submit their electronic signature.
Creating The Request Form
We will create the form first, being careful to give all the fields good IDs so that we can reference them in the next step where we create the HTML template.
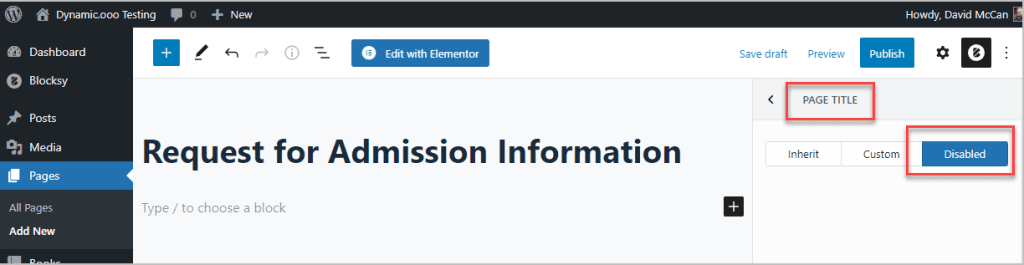
I start out by creating a new page and I use the theme’s option to hide the page title. I’m using the free Blocksy theme. There is also an option to hide the page title in Elementor, but I’ve found it always works when using the theme.
I save and go into Elementor. First I add a container widget (or Section) and set it to full width. I prepared a banner image which will be used on the page and in the PDF. The image is 1400px by 200px. I wanted to include an image so that you can see how to add it later in the PDF. It doesn’t matter what image you pick. Maybe a logo would be good, but don’t make it too big or it might take up a lot of the PDF page. That’s why I set mine to only 200px tall. So next, add an image widget to the container and pick the image.
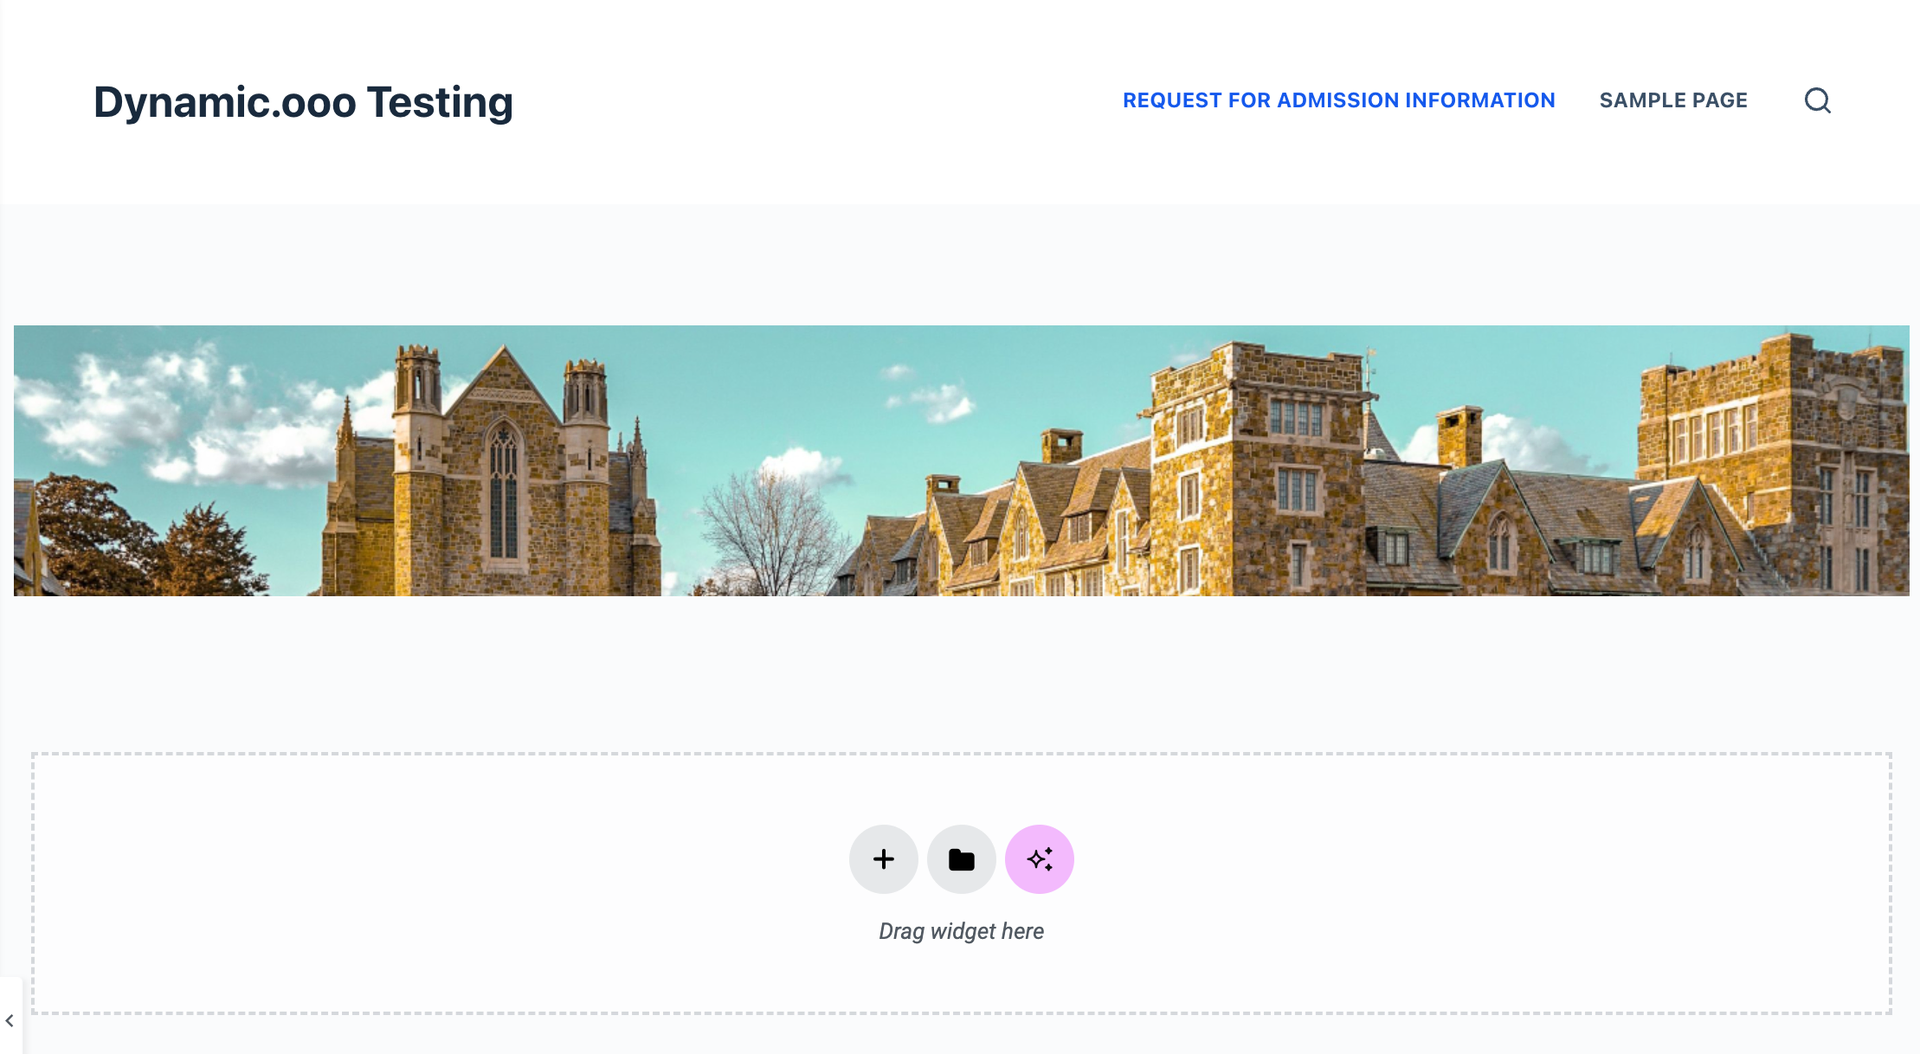
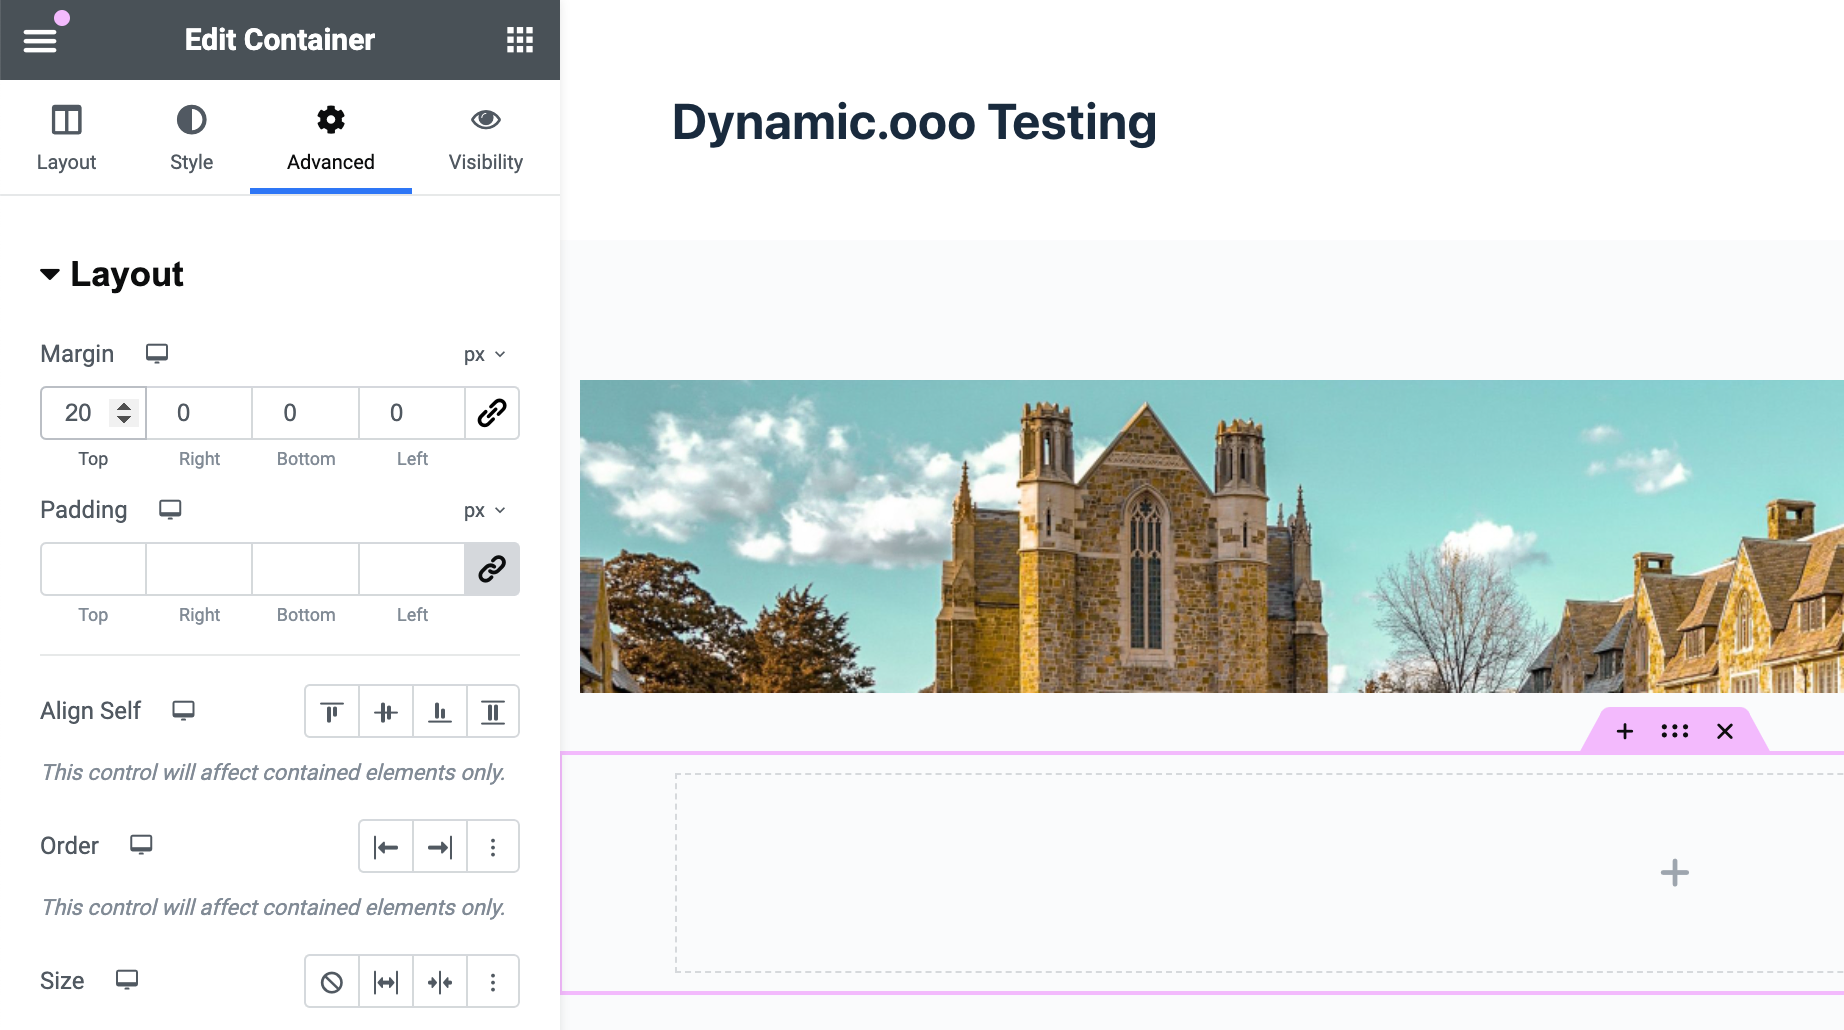
I then go and add another single column container under the first one. In the Layout tab I set it to Boxed with a width of 1,000 pixels and in the Advanced tab I get it a top margin of 20px.
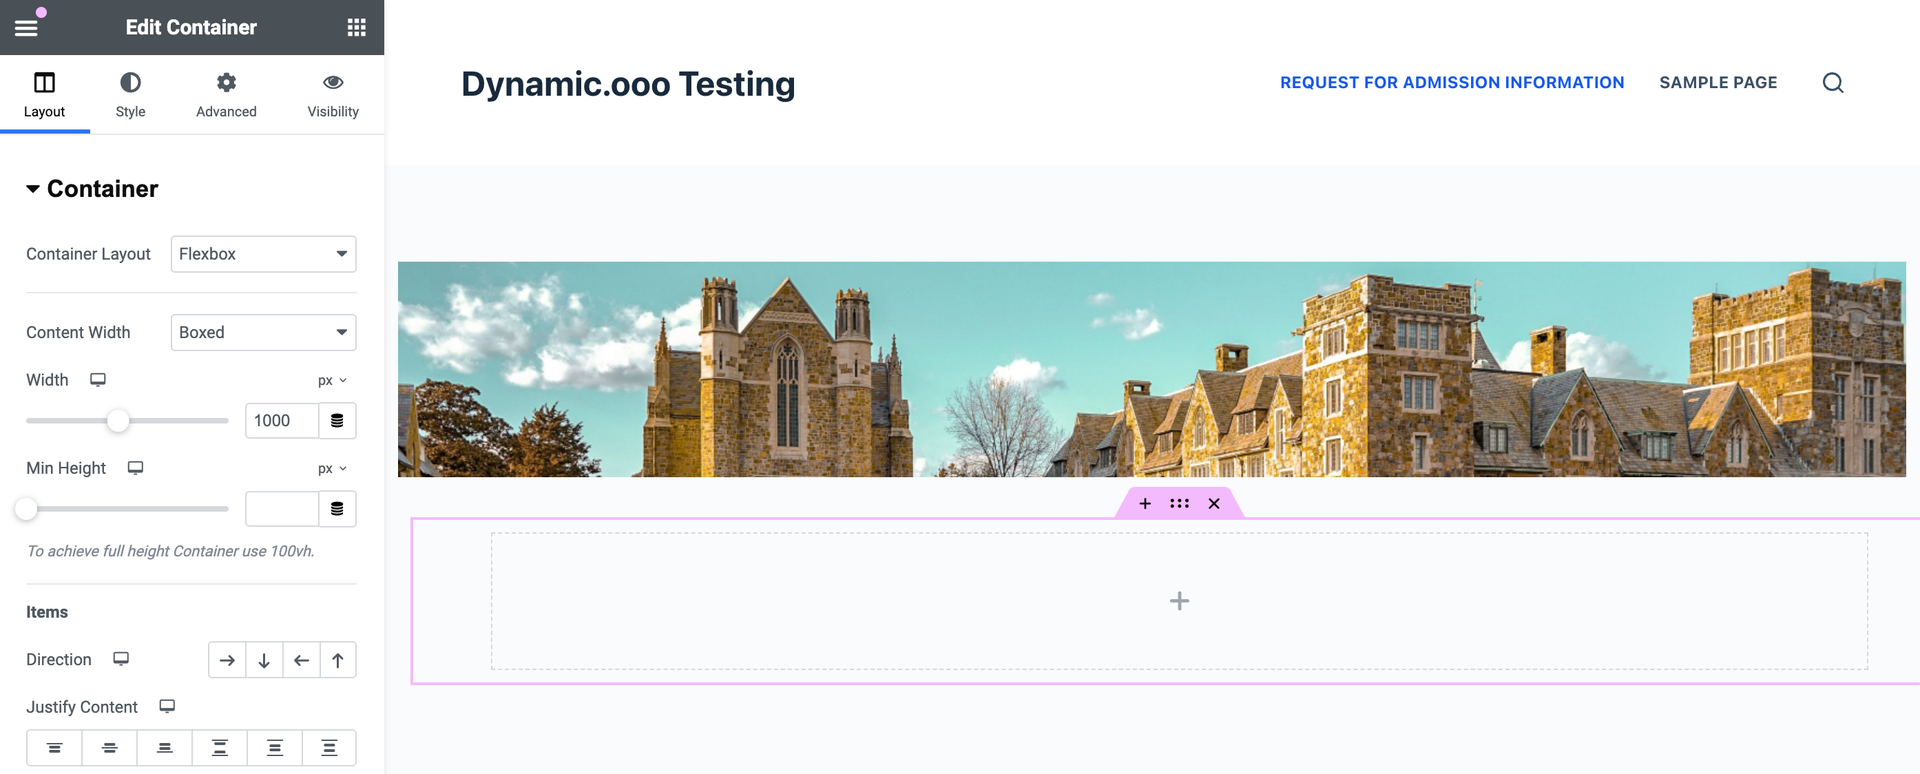
The first widget added to the container is a Heading widget. I give the title as “Request for University Admission Information” and on the style tab pick a dark color. Under that I add a Text Editor widget with the text “Please fill out the form below to request information about our University. A packet will be emailed to you.” I adjust the text size to make it larger.

Next I drag a form widget and put it under the Text Editor. The core version of Elementor doesn’t have a form option, which is why we are using Elementor Pro. By default the form has fields for a contact form. Click the X next to the Message field to remove that field.
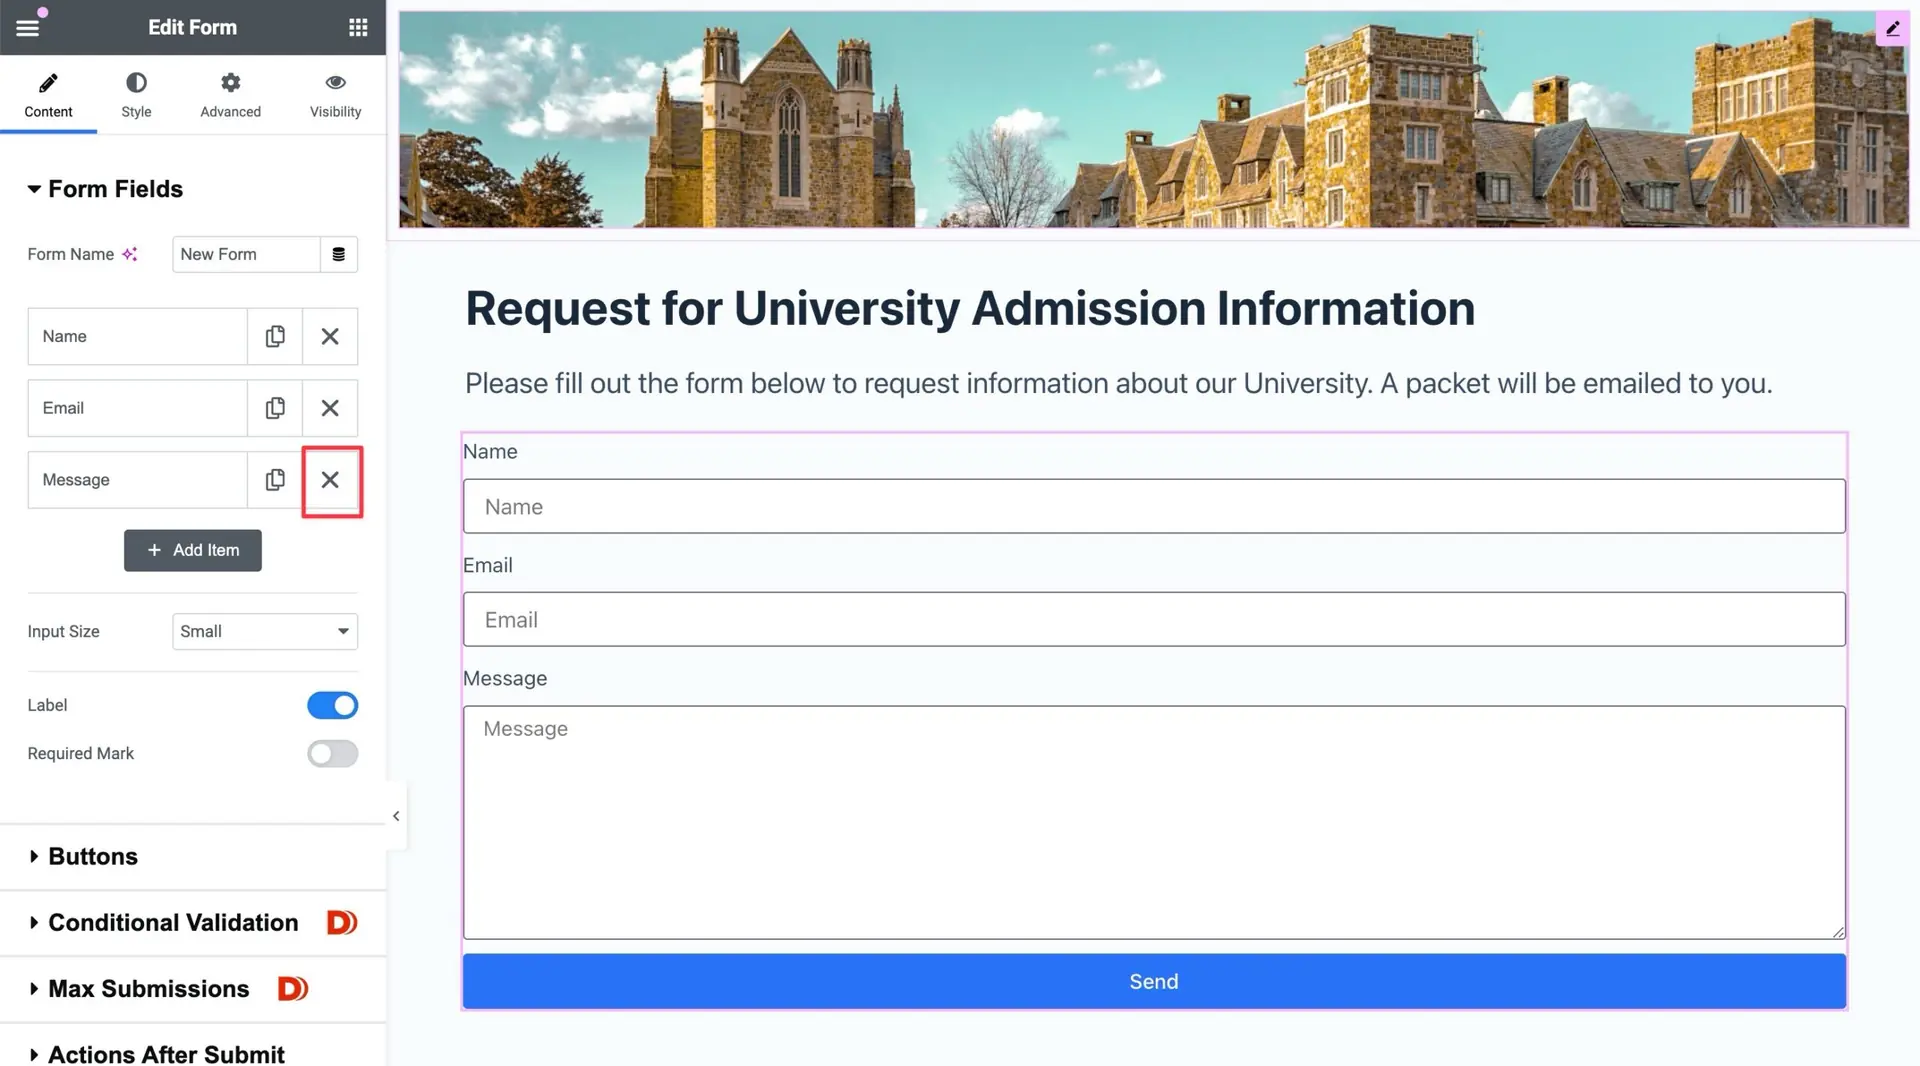
Name and Email Fields
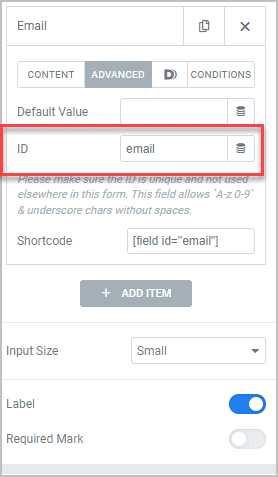
You see the list of fields in the Content tab. That is a repeater. Each field has its own tab which you can open by clicking on the name of the field. Setting the width to 50% on the Name and Email fields will put them side by side. Setting the fields to required also will make sure the form doesn’t get submitted with incomplete information.
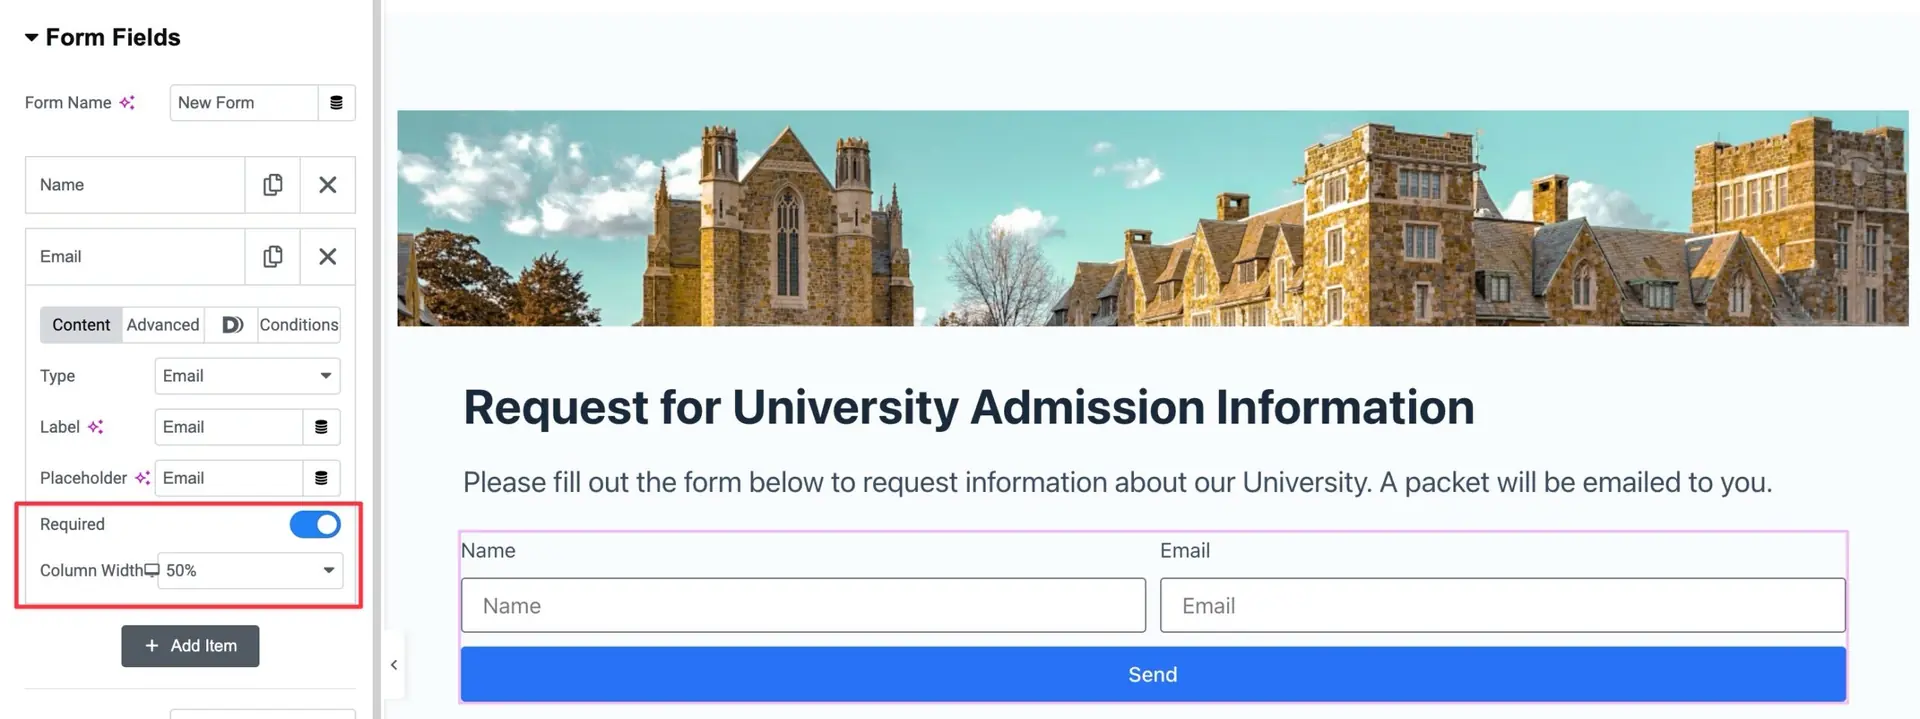
While you are there, note the “ADVANCED” tab. Click on that and notice the where the field ID field is set. We have to use the field ID in the HTML template, so make sure each field gets a simple id.
Majors Field
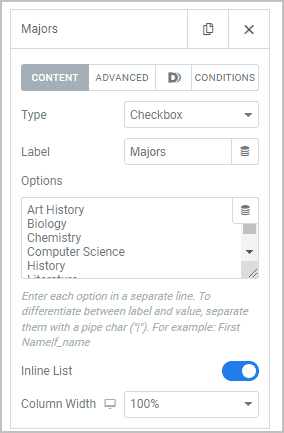
OK, now the fun begins! We are going to add the additional fields for the form. Click on the Add Item button to add a new field. We are going to ask people which subjects they are interested in. Select the Type drop down and pick Checkbox. Give it a label of “Majors”. I added these into the Options box, one to each line. Then I toggled on Inline List, which lines them up across the page.
Art History
Biology
Chemistry
Computer Science
History
Literature
Mathematics
Physics
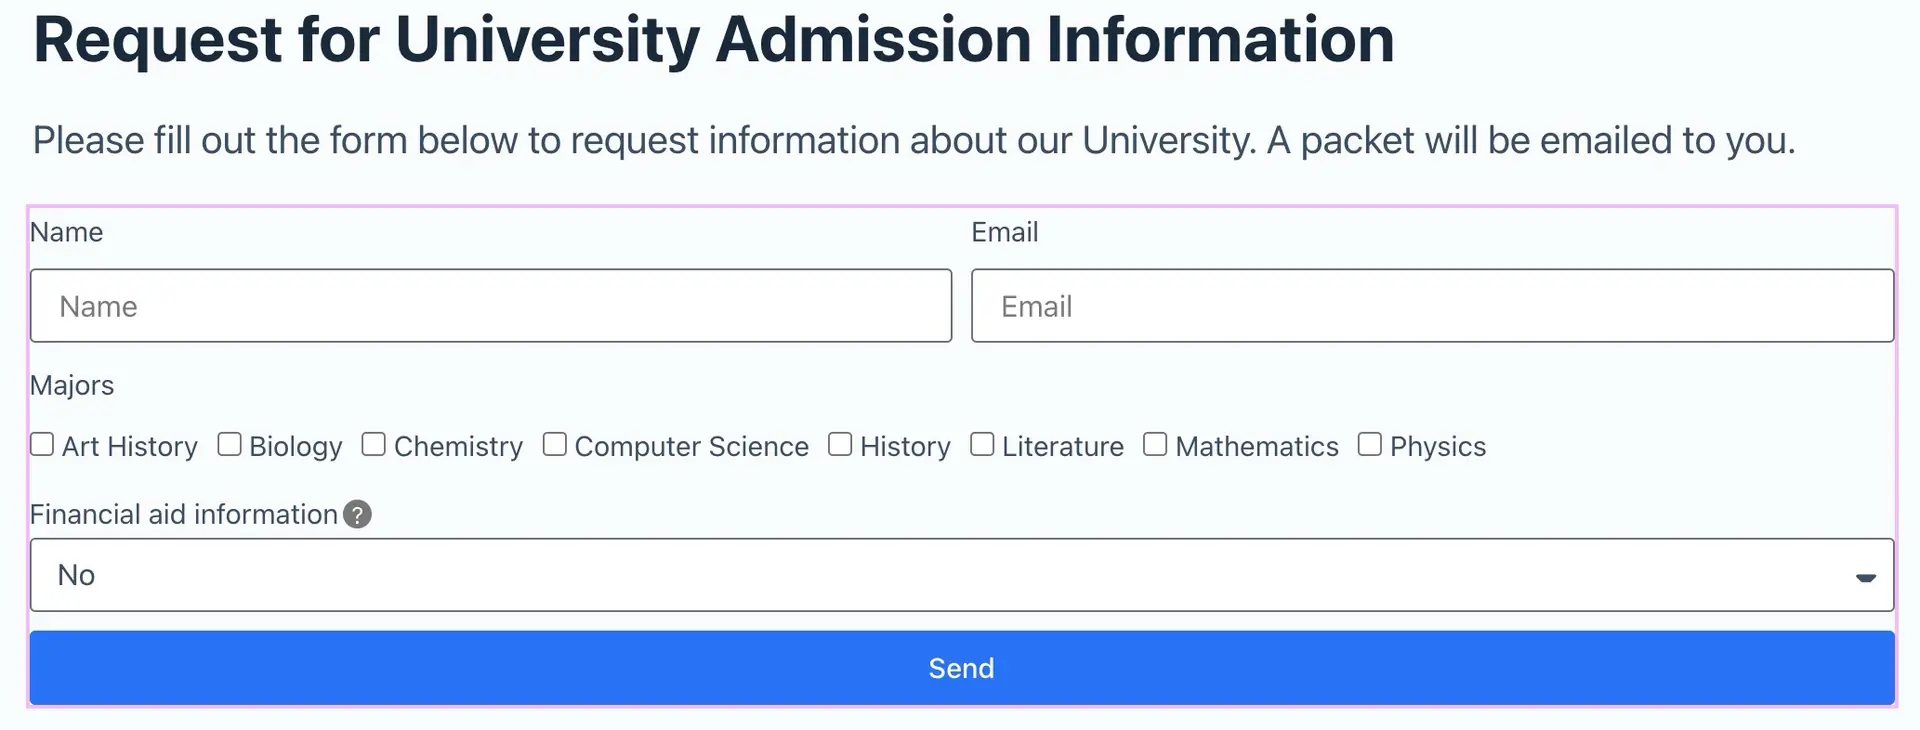
Here is what the form looks like so far:

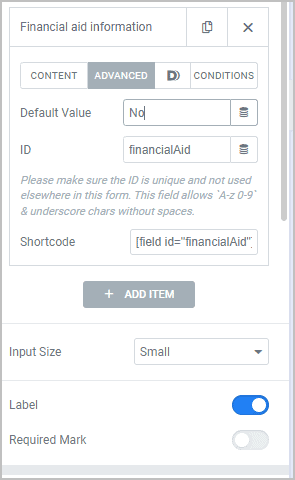
Financial Aid Field
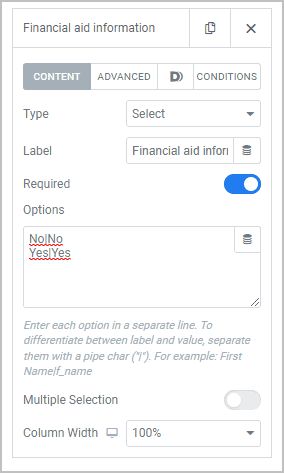
Next we are going to ask if they want financial aid information so we add another item, pick Select for the field type, and give it a label of “Financial aid information”. Set it to required and in the Option box we enter:
No|No
Yes|Yes
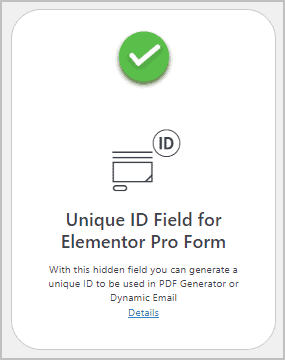
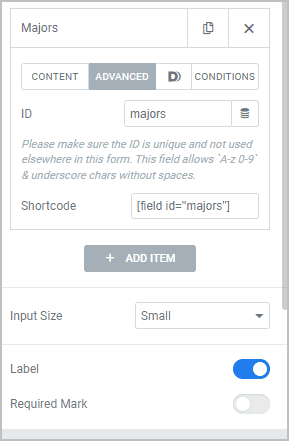
Then on the Advanced tab set the default value to “No” and give it an ID of “majors”.
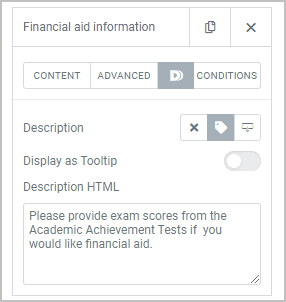
You may have noticed next to the Advanced area there is a Dynamic.ooo “D” and a Conditional area. These are added by Dynamic.ooo. Click on the D and lets create a help icon with hover text. Next to the Description label, click on the middle icon that looks like a tag. In the Description HTML I added “Please provide exam scores from the Academic Achievement Tests if you would like financial aid.” This will be the hover text.
And here is the form with the Financial Aid field. You can try it out to see the text by hovering over the question mark icon.
Test Score Fields
Now we are going to add three Text fields: Literature Scores, Mathematics Scores, and Science Scores. Each one will be set to 30% width, so they line up on one line. Here is the Literature Scores Content settings:
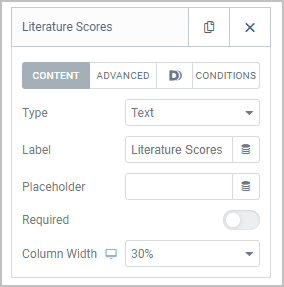
On the advanced tab give it the ID of “literatureScores”. Then click on the “Conditions” tab and click the middle icon for “show if”, and in the Conditions Expression area enter: financialAid == “Yes”
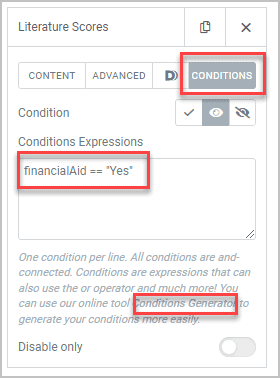
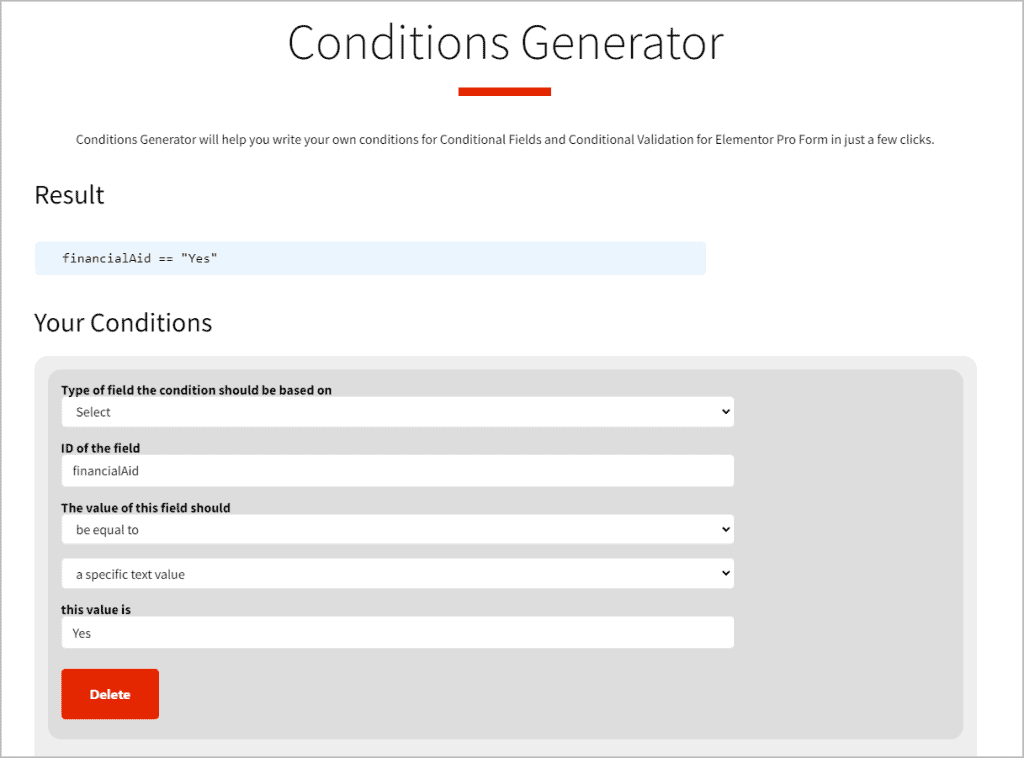
Here we are setting the condition so the Literature Scores field only shows when the Financial Aid select is set to Yes. If you aren’t sure what condition to enter, on the Dynamic.ooo website there is an online conditions builder! The link is in the help text. I filled out the form and copied the Result to the Conditions Expression box.
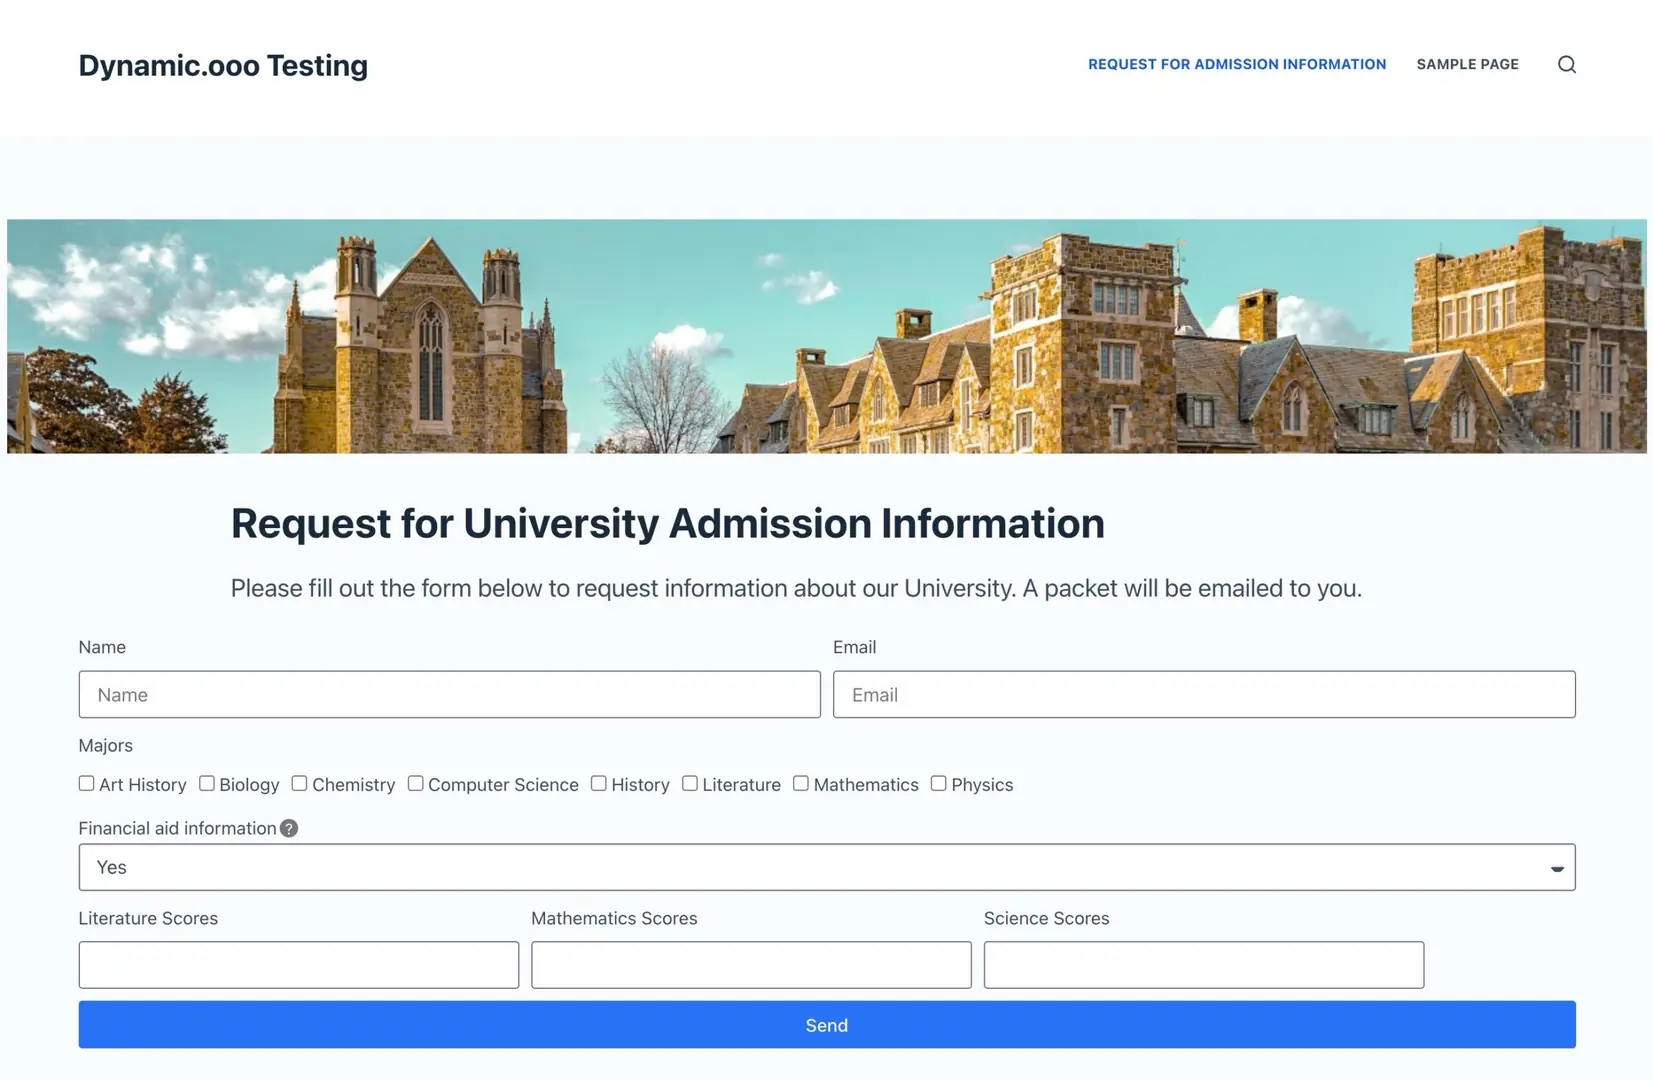
Go through the same steps for the other two Text fields, using the same condition, but of course giving them their own names and IDs (Mathematics Scores / mathematicsScores, Science Scores / scienceScores). This is what the form looks like now:

If you save now, click on the Preview icon (next to the Save / Update button in the bottom left), you can test the show / hide feature by switching the Financial aid information from No to Yes and back.
Acceptance Field
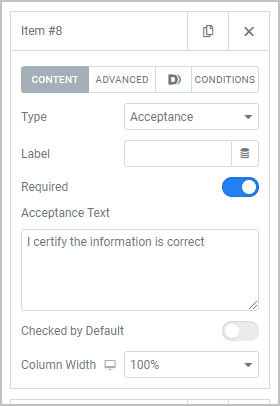
Are we having fun yet? We are almost done. Click to Add Item and for this one pick Acceptance for the field type, leave the label blank, toggle it as Required, and for Acceptance Text enter “I certify the information is correct”. It is OK that the label is blank.
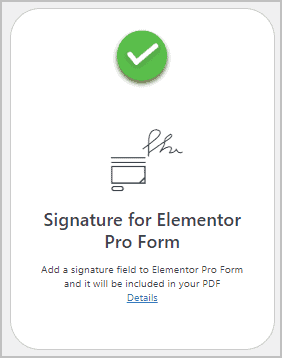
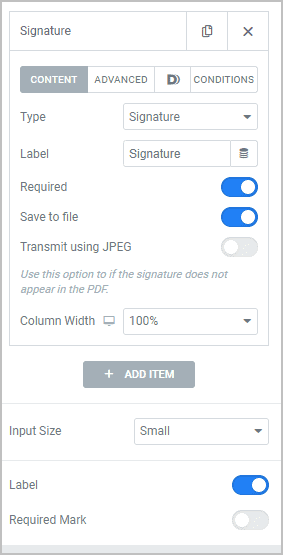
Signature Field
The last field is the signature field. Click Add Item and pick Signature. Give it a label of Signature, and toggle on Required and Save to File. On the Advanced tab give it an ID of signature.
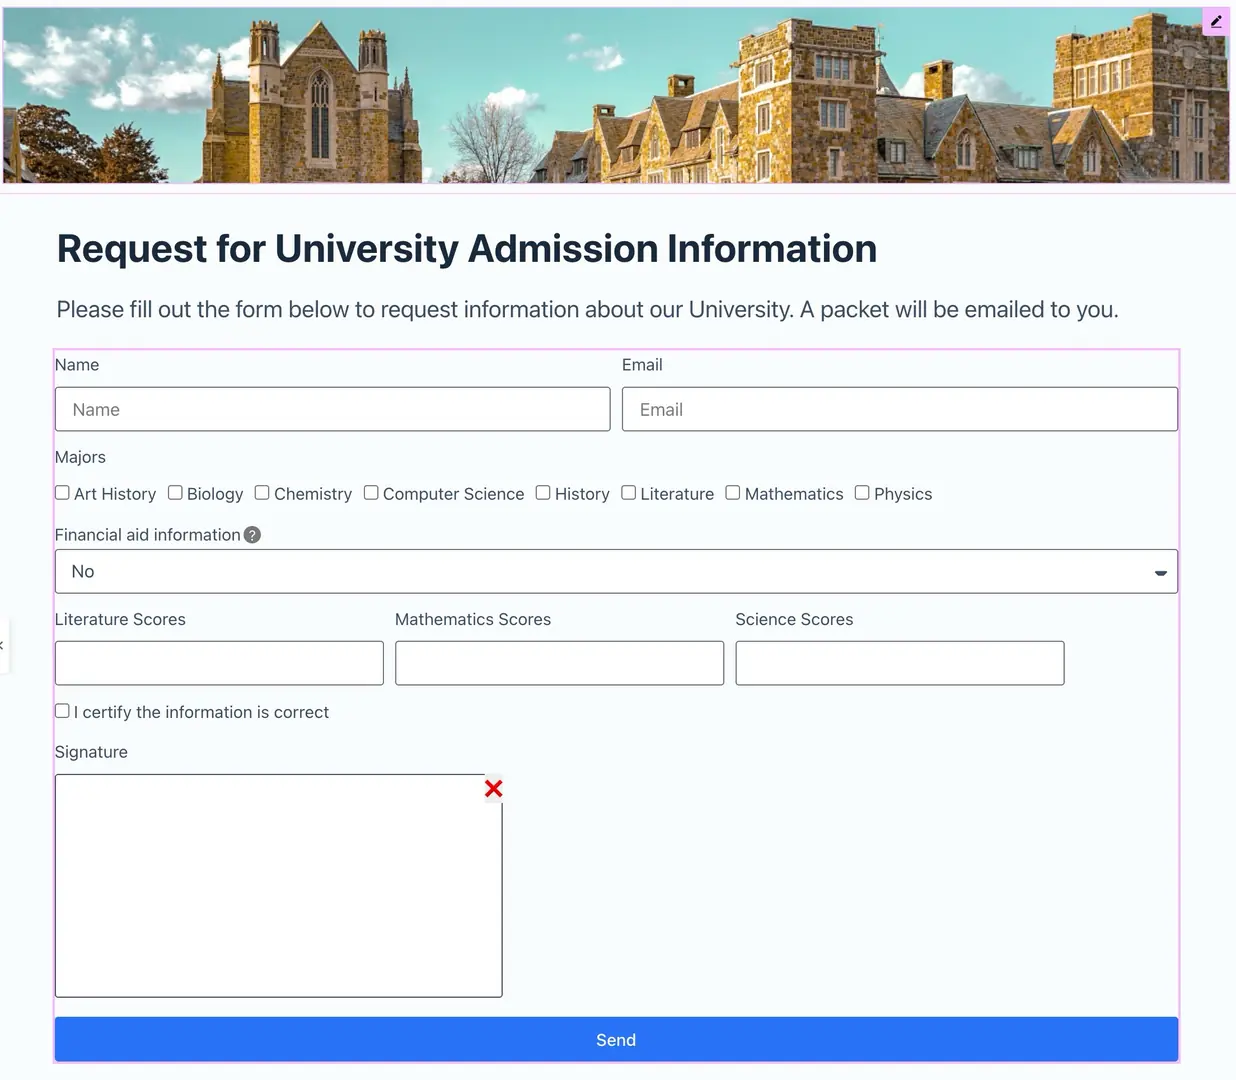
Here is the form so far:
Submit And Actions
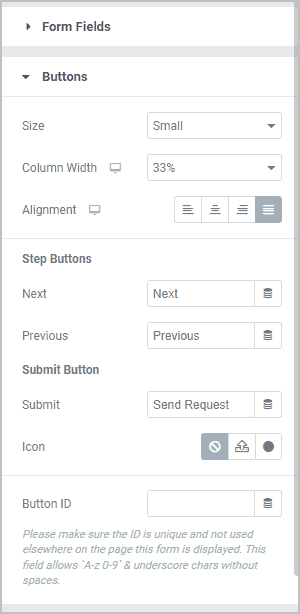
Now click on the Buttons panel below the form fields panel. Set the Column width to 33% and change the text to Send Request.
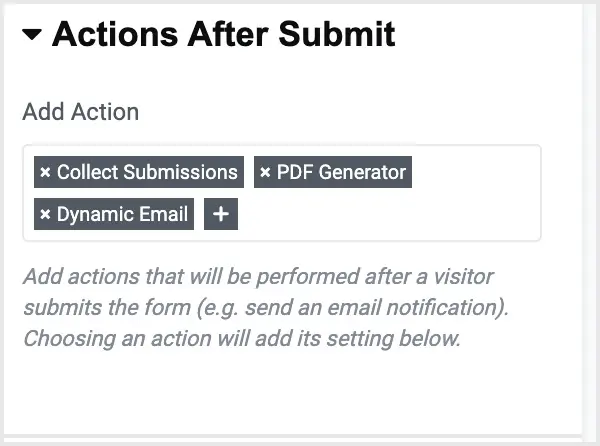
Next go to the Actions After Submit panel. Remove “email” by clicking on the X next to it. Click into the box to get the list and add PDF Generator and Dynamic Email.
Go to the Dynamic Email panel and click Add Item. Click Enable Email and in the settings enable “Attach the PDF generated by the PDF Generator Action.” Change the to and from email addresses to ones for your site.
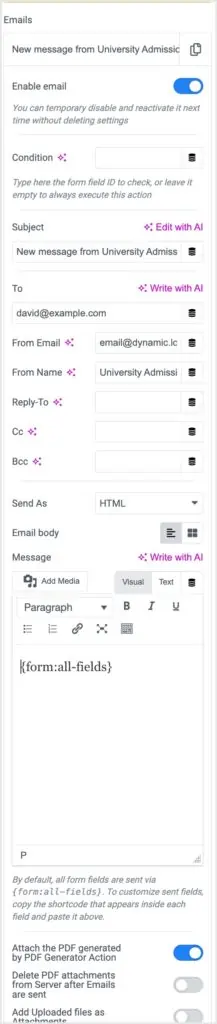
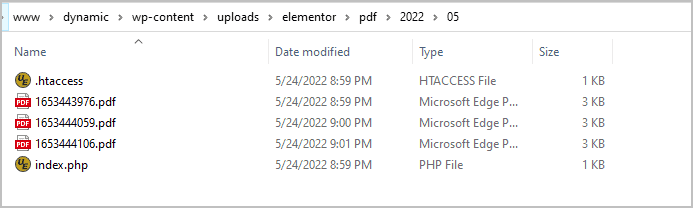
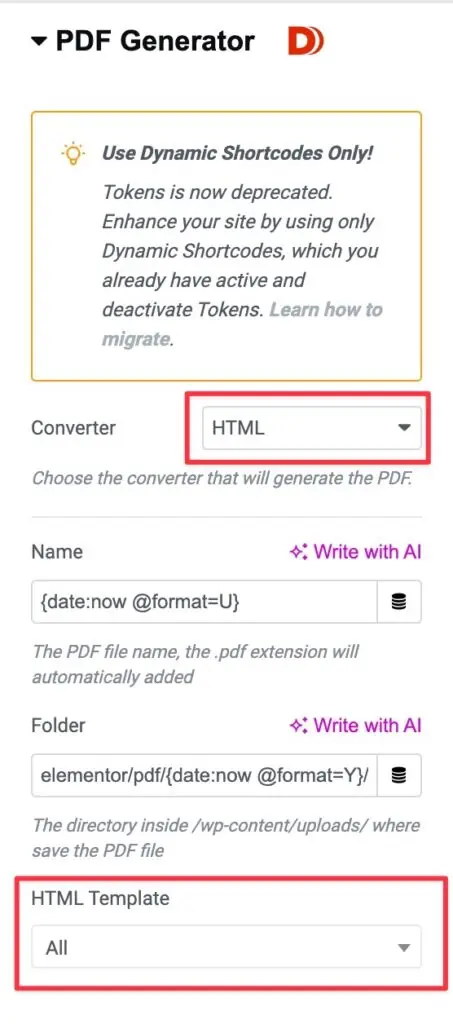
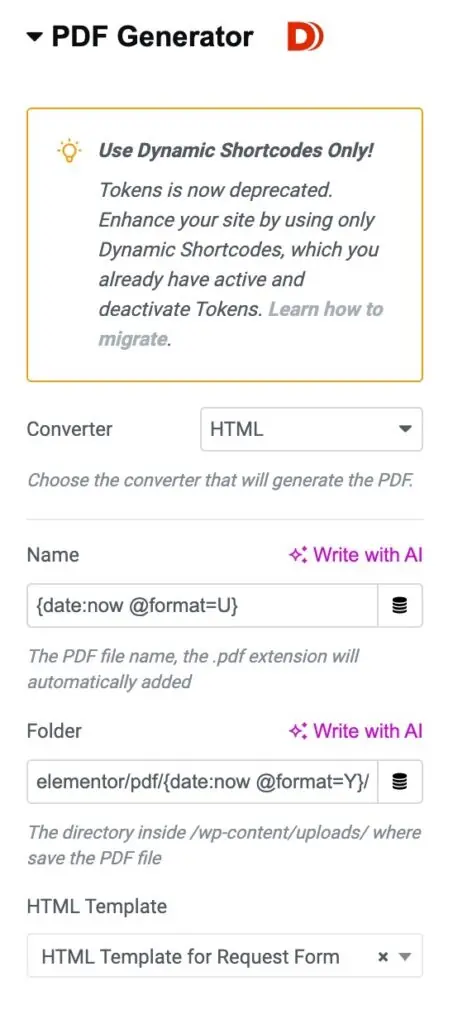
Finally, go to the PDF Generator panel and from the drop down pick HTML for the converter. Note the Folder field. This tells you where the PDF will be saved. For testing don’t change it because it is easy to make a mistake with the folder structure. Here is a screenshot after I made a few test PDFs. You can see the path in the header area.
Here is the PDF Generator Settings. Note at the bottom where you pick the HTML Template. We haven’t created ours yet, so we will need to come back here after doing so and then we can pick if from the list.
Save and go to preview.
We are done creating our form. Now let’s create the HTML template for the PDF.
Creating the HTML Template
Tour of the Editor and Getting Ready
The interface for creating the HTML template is reached by a menu item under the main Dynamic Content for Elementor menu.
When you click the Add New button you get an example template to make it easier to get started. We’ll modify this to create our custom template. Don’t worry about deleting example code out as we go along. If you go back and create another template you will get the same example.
The page where you create the HTML template has several sections. The main sections are the title, HTML editor, and the page size drop down. The other areas provide help information and some testing options. At the bottom there is a section called Preview Data. Here you can pick a page from the drop down list to see ACF fields etc. However, the main testing is the bottom text area where you enter some test data with the name of the field first. There are some examples of test data you can enter. Then there is a Preview PDF button that you would click to see the template rendered. In this walk-through we aren’t going to use that test feature.

Start by giving the HTML Template a title. I’m calling mine “HTML Template for Request Form”. If you are going to have more than one then you should give it a descriptive name so it is easy to know what it is for. I’m also going to change the Dimensions to Letter size. Set the size that fits the typical paper size for printers your users use. That’s the easy part.
It is likely that we will have typos or make mistakes, so I like to test as I go along because it usually makes it easier to find the errors. If you try to create the entire thing and then test it might be harder to pinpoint issues. Now that we’ve set the title and page size click the Publish button to save. This is a bit of a detour, but open up the page with our form in another browser tab. Go into Elementor, click on the form in the editor, and then open the PDF Generator panel on the right side.
Go ahead and update and then click on the Preview button. This will open the page with our form in another tab. Once we are ready to test we can go to this page and test progress. So, now we have three tabs open: the Elementor page, the HTML Template editor, and the Preview tab.
OK, now let’s work on the template. Back in the editor, we can see that the HTML template in the editor area has a similar basic structure as most HTML documents. At the top in the HEAD section there is a STYLE block where we are going to enter our CSS. The example has some set for default fonts. You can change the font and there is a section with some help information. There is also a help doc about this mentioned in the Resources section at the bottom. I suggest not changing the font at least until you have everything else working. Below the HEAD section is the BODY section and this is where the content will go.
Page Header
Immediately after the opening BODY tag there is a block for the page header (htmlpageheader). This will output the text and page number at the top of the page. See where it says “Page”? You can customize the text and add your own text there, for example, you could add the organization name: “University Request Receipt – Page {data:page-number} of {data:number-of-pages} ”.

Just be careful not to change the variables in the curly brackets. Remember this is a starting example, so if you are sure your PDF will only be one page and you don’t want to have the page header, you can just remove this entire block. There is not that much data on my form, so I’m going to remove this header block.
Adding in the Banner Image
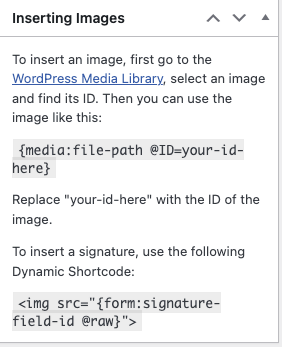
In the space between the opening BODY tag and the H1, I’m going to add a DIV block and inside that I’m going to add an image tag to bring in the banner. On the side of the page there are some example for adding an image tag. I combined these and used the HTML image tag, but with the media: file-path token (see below).
I copy that and paste it the middle of the DIV opening and closing tags.
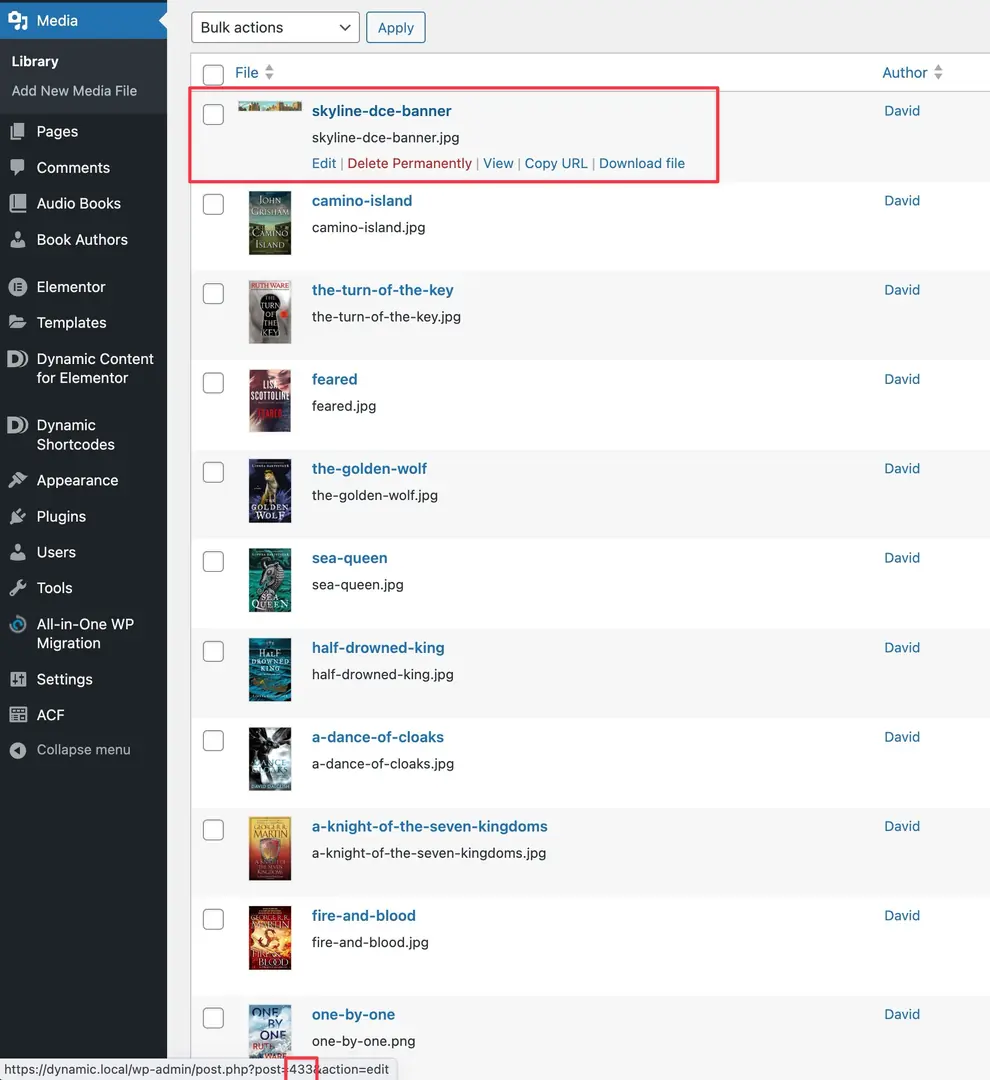
Now we need to get the ID of the banner image. In another tab I go to the media library. There is the option to switch the view to a list. Then I hover over the banner image and in the footer of the browser I see the image ID.

So I replace the “ID” on line 19 with the image ID, which in my case is 433. Save.
Go back to your page with the form and fill it in and submit.
I see a success message at the bottom of the form. This means that a PDF was created, so let’s go check it. Go to the folder under “uploads\elementor\pdf\…” and the most recent date, find the newest PDF in the folder and open it. Great, the banner image is showing.
Outputting Name and Majors
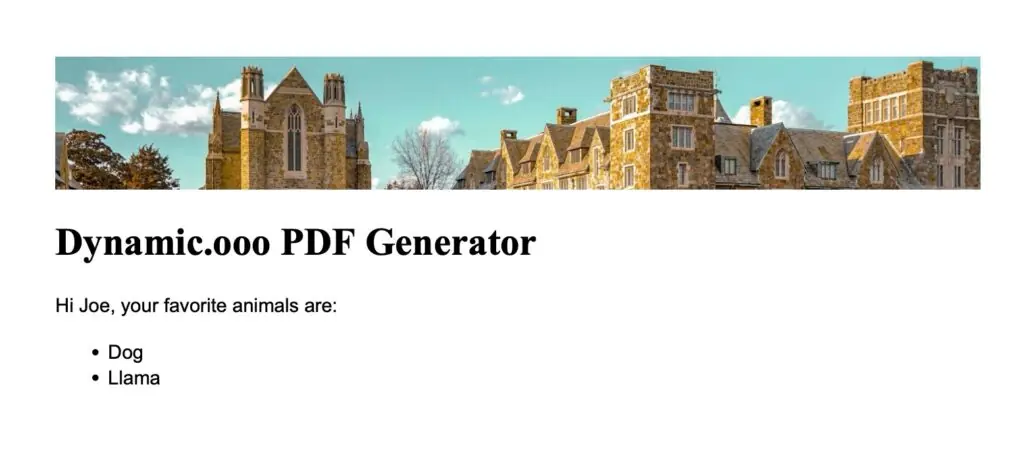
In the screenshot above note that my name from the form is also showing. However, the example template has something about animals.
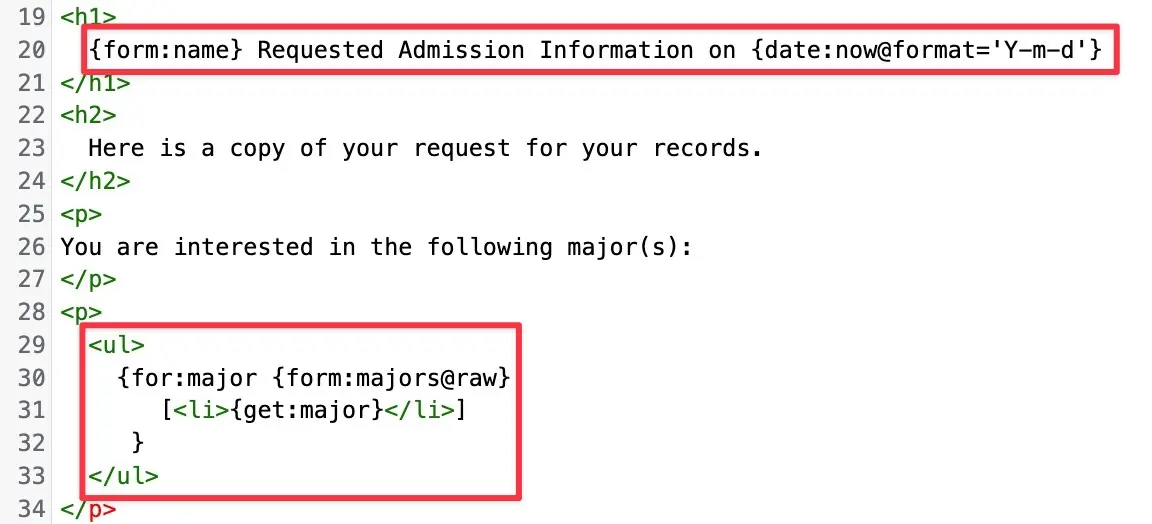
Let’s fix this section up next First, in the H1 header tag, let’s change that to our own message. So I change that to “Request for Admission Information”. Under that I add an H2 tag with the message: “Here is a copy of your request for your records.”.

Line 20 is changed to “{form:name}” Requested Admission Information on {date:now @format=’m/d/Y’} ”. See the first variable is “{form:name}” and “form” refers to our Elementor form. We can reference all of the variables on our form with the “form” variable. The “name” part is the name field. The “form:name” is enclosed in one set of curly braces. That is the Dynamic Shortcodes syntax for outputting dynamic data. I added the date variable at the end of that line.
I added a paragraph tag and in it wrote “You are interested in the following major(s):” Then we go to the next block and we see a UL tag. That stands for Unordered List. Remember when you output data using Dynamic Shortcodes it is one curly brace. A FOR LOOP is saying that for every item in the list, print it out. Note that the “major” variable is in between two LI tags. LI stands for list item. Then there is an end tag for the for loop and the closing HTML tags to match the opening tags above the for loop. Let’s save and go back and test the form.
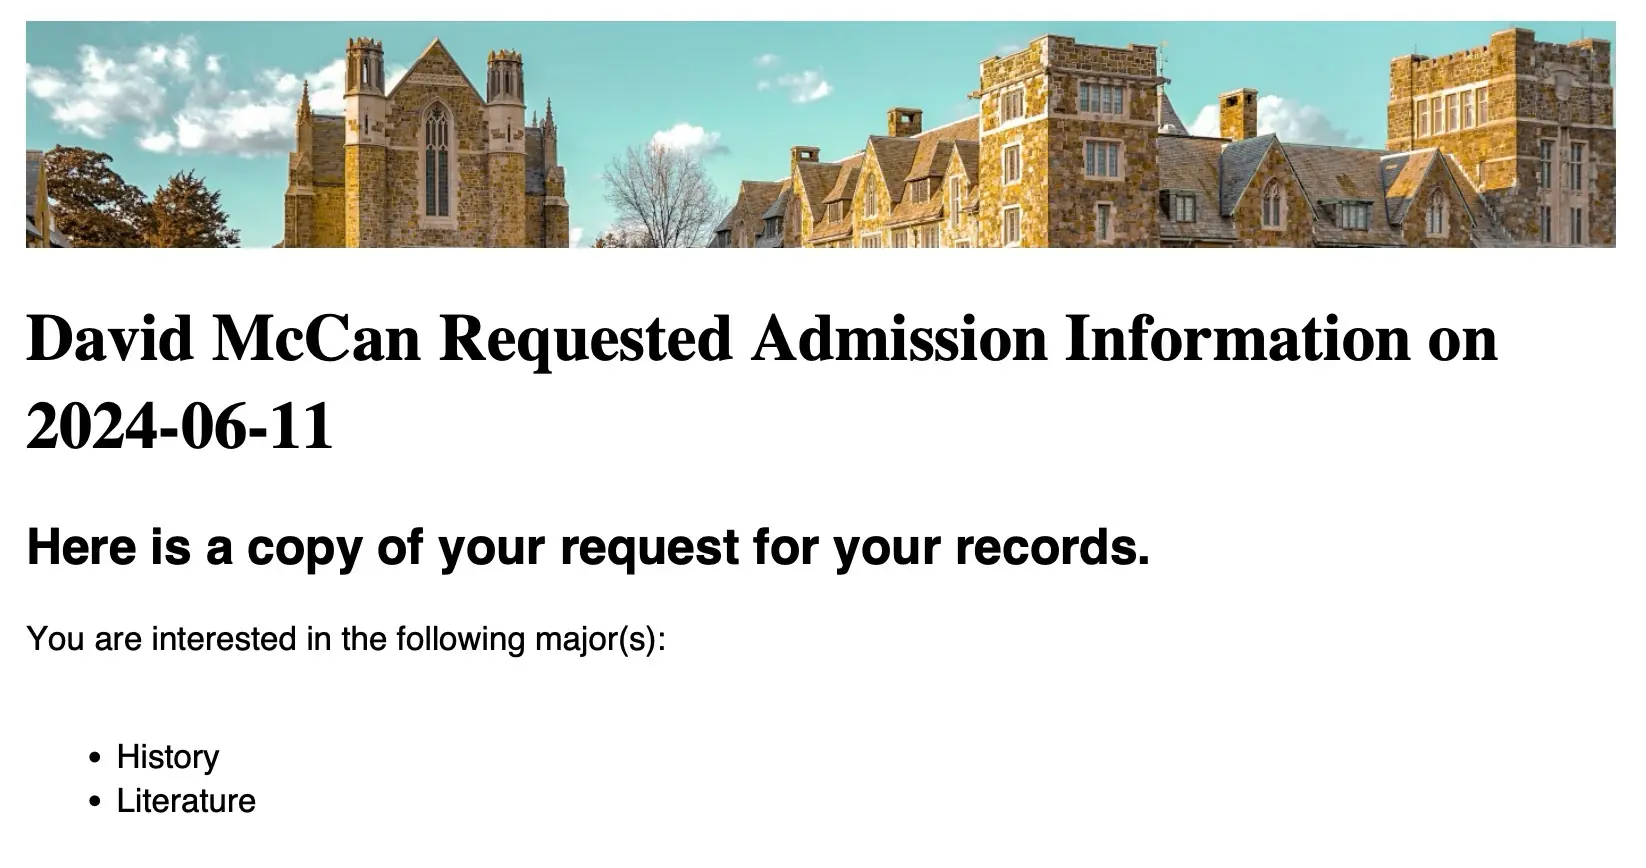
I got a success message so I went to the PDF folder and opened the most recent one. Great, I see the name, date, and majors.
Conditionally Outputting Test Scores
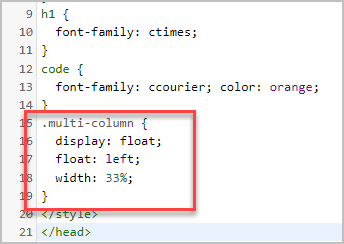
Now, lets output the test scores. First I’ll add a class to show the three test scores as three values across. I highlighted in the code the “class=”multi-column” bit. This is some CSS code from the help docs for the HTML Template. Note that we need to add the class definition into the STYLE area in the HEAD section. As per the instructions, I changed the width to 33% or three columns.
Now lets output the test scores. This block will use two features. First, a Dynamic Shortcodes conditional. Since it is an option to enter the test scores on the form, we will check to see if Financial Aid is set to “Yes”. If it is, then we will show the test scores in three columns. This is what the code for this looks like:
{if:{eqv:{form:financialAid} Yes}
	[<p>
	You expressed interest in financial aid. Here are your scores:
  </p>
	<div class="multi-column">Science: {form:literatureScores}</div>
	<div class="multi-column">Science: {form:mathmaticsScores}</div>
	<div class="multi-column">Science: {form:scienceScores}</div>]
}
The first line is the conditional IF statement. There are some examples in the Dynamic Shortcodes docs. So on the first line we test to see if form.financialAid is equal to “Yes”. Remember, we set the ID of that form field to “financialAid”. The three DIVs for the subjects have the tags with one curly brace around the form field IDs. The last line closes that statement block.
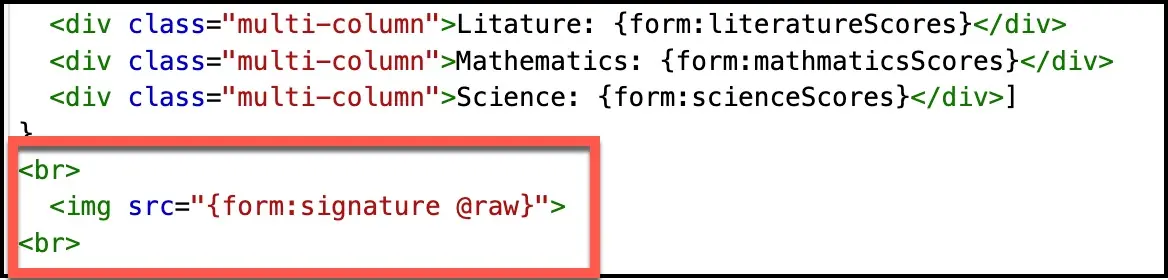
Output the Signature and Final Touches
Now lets output the signature. There is an example for that also on the side in the “Inserting Images” instructions. I copy that code in and surround it with some HTML. Remember to match the ID to the ID set for the signature form field on the form.
I remove the blurb at the bottom about the HTML template and add a relevant message. Here is the form filled out on the front before submitting it.

Now, this is the final output.
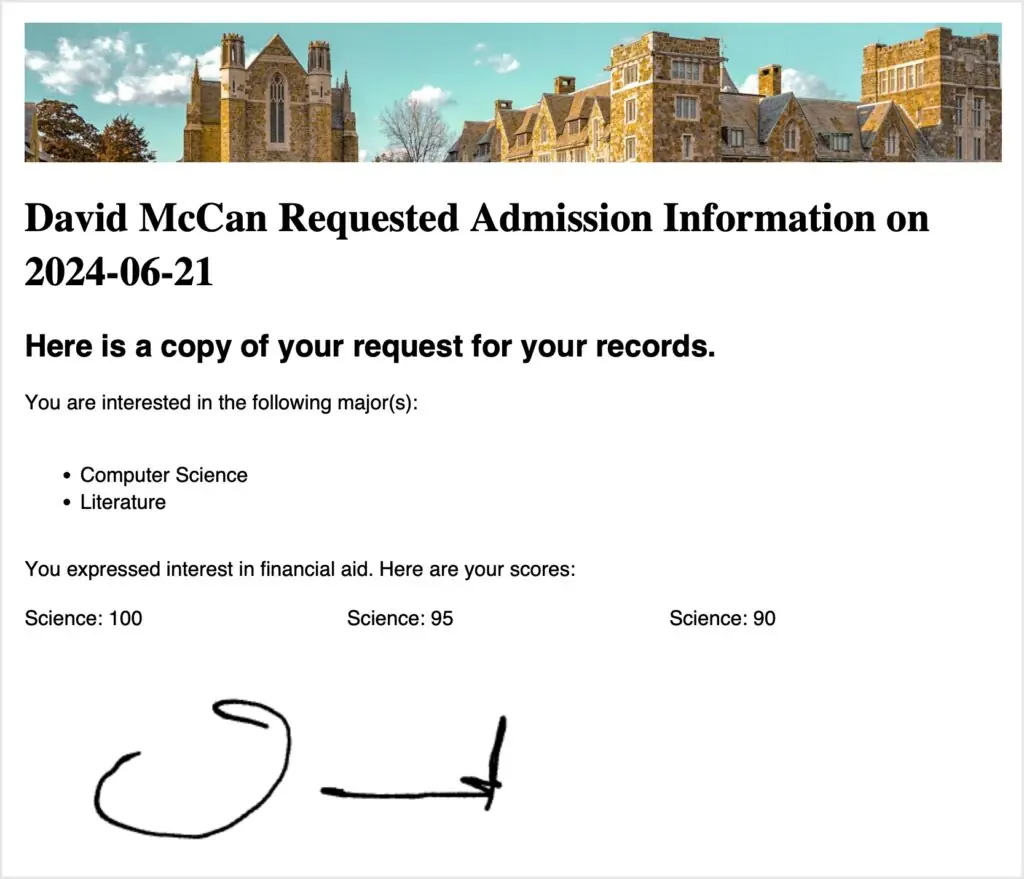
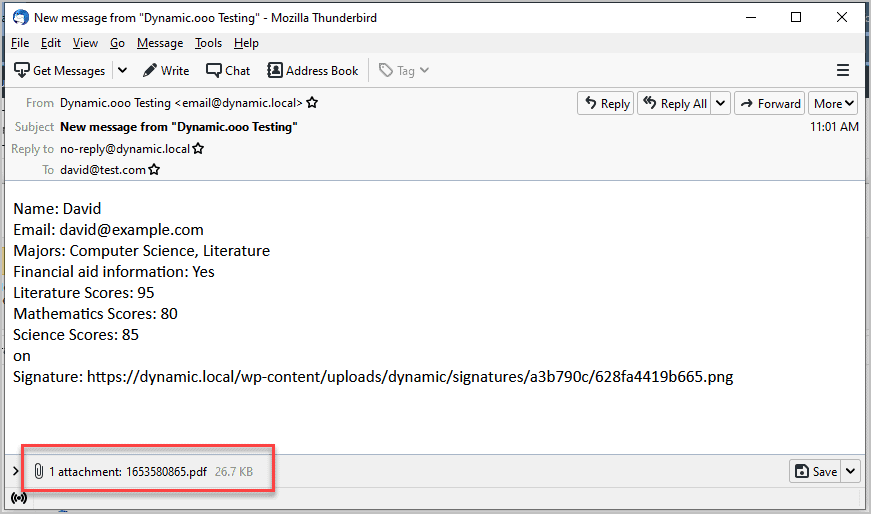
Remember that we set up an action after form submission to send an email with the PDF? Here is the email that was sent. The PDF is an attachment at the bottom.
Adding a Custom Font
If you want to add a custom font you can follow this doc:
<a href="https://help.dynamic.ooo/en/articles/5782053-how-to-add-a-custom-font-on-html-converter-for-pdf-generator">https://help.dynamic.ooo/en/articles/5782053-how-to-add-a-custom-font-on-html-converter-for-pdf-generator</a>HTML Template Source Code
Here is the code from the template we created in the tutorial.
<head>
<style>

body {
  font-family: chelvetica;
}
h1 {
  font-family: ctimes;
}
code {
  font-family: ccourier; color: orange;
}
.multi-column {
  display: float;
  float: left;
  width: 33%;
}
</style>
</head>
<body>
<div>
  <img src="{media:file-path @ID=433}">
</div>
<h1>
  {form:name} Requested Admission Information on {date:now@format='Y-m-d'}
</h1>
<h2>
  Here is a copy of your request for your records.
</h2>
<p>
  You are interested in the following major(s):
</p>
<p>
<ul>
  {for:major {form:majors@raw}
  [<li>{get:major}</li>]
}
</ul>
</p>
{if:{eqv:{form:financialAid} Yes}
[<p>
You expressed interest in financial aid. Here are your scores:
</p>
<div class="multi-column">Science: {form:literatureScores}</div>
<div class="multi-column">Science: {form:mathmaticsScores}</div>
<div class="multi-column">Science: {form:scienceScores}</div>]
}
<br>
 <img src="{form:signature @raw}">
<br>
</body>
Discussion and Conclusions
In this tutorial we used the Elementor Pro forms together with the Dynamic Content for Elementor extensions for the PDF Generator, Conditionals, Signature, Unique ID, Field Description, and Dynamic Email. These are just 6 of the 39 extensions for Elementor Pro forms that come with Dynamic Content for Elementor. These extensions bring a lot of professional functionality and polish.
We also used the new Dynamic Shortcodes functionality. The basic syntax is pretty straightforward and there are a lot of documentation and examples on the Dynamic.ooo website.
Creating the form and the HTML template are not just drag and drop. They are power tools and require a little extra effort. The good news is that the Dynamic Content for Elementor extensions are well documented. It is pretty amazing that this functionality is available for Elementor.
Note: Special thanks to the Dynamic Content for Elementor team who helped with this tutorial!
Use coupon ILOVEDYNAMIC for 10% off